Archive for the ‘look-and-feel’ Category
Experimenting with BlackBerry Graphics!
 Leave a comment
As I said the other day, I started my space explorer game by trying out a bunch of different ways to animate the rocketship flying through space. (I’ve bundled all the source code and resources for the complete example — you can download it here.) I started by just creating a standard MIDlet using the javax.microedition.lcdui.game classes. Here’s what it looks like in the debugger:

In the image, I’ve set the debugger to show memory usage. In this case it’s “lcduispace” — the top process on the list. Next, I decided to try out the technique I described in my earlier post: use the same lcdui game implementation, but write each frame into an image buffer and transfer it from the MIDP Graphics implementation to RIM’s proprietary implementation to display it in a RIMlet. Here it is in the debugger: Continue reading
BlackBerry’s two Graphics implementations: Can you use them both? In the same App?
When I first started programming for BlackBerry, one of the things that struck me as most odd was the two completely independent graphics APIs. For MIDlets, there’s javax.microedition.lcdui.Graphics, and for RIM’s own profile, there’s net.rim.device.api.ui.Graphics. The two versions are so similar to one another that — if you’re careful — you can write a game that can use either of the two graphics APIs interchangeably, just by swapping out the include statements (and using a different set of lifecycle classes). That’s what I illustrated in Chapter 3 of my book.
But I wondered: What if I want to use the javax.microedition.lcdui.game package? But I still want to take advantage of RIM’s proprietary UI component handling? Is that even possible? Note that you can’t just place an LCDUI Sprite onto a RIM Screen or use lcdui Images interchangeably with RIM Images. Yet, there’s nothing to stop you from instantiating many of the lcdui graphics-related classes in a RIMlet — either type of application has access to the whole API.
Through experimentation, I found that it’s quite possible to take a game that was written using lcdui game Layers and run it in a RIMlet. The trick is the following: Continue reading
Easy, fun game sprites made with SVG!
I downloaded and installed Inkscape in order to draw an animation to play with the Scalable Vector Graphics API. Inkscape was quite helpful for creating my game’s opening SVG animation (though it would have been more helpful if it could save the file in “SVG Tiny”…). What I didn’t expect was how helpful Inkscape is for drawing standard game sprites — drawn first in Scalable Vector Graphics format, then exported as PNG files!
I needed an rocket sprite for my “Space Explorer” game. Here’s what I came up with:

You can see that the four frames give a spinning effect. (The lower row gives the frame sequence for when the engines are turned on.) I’m more an engineer than an artist, but here’s how Inkscape and SVG made it easy for me to draw this: Continue reading
The BlackBerry Red Key!
When I’m running an application on a BlackBerry device — and I hit the red key — my app disappears, and the menu screen reappears. I’d guess that my app’s screen was popped off the BlackBerry screen stack, so onClose() was called and my app cleaned itself up neatly, right?
Wrong. The application was merely sent to the background.
I assume this behavior is mentioned somewhere in the bowels of the RIM documentation (although I’ve read quite a lot of it, and I haven’t seen mention of this). Nor do the sample applications appear to deal with it. I just figured it out when my colleague Andrew Davison sent me a game that plays music in the background. It was a tad loud, so I instinctively tried to shut it off in one click using the red key. And the game went away, but the music kept right on playing…
It reminds me of a little something I read in the PodTrapper story:
My curve has 32MB of RAM and 64MB of flash. The flash can be used for paging if it’s available, but on my device only about 20MB of it is, and that fills up fast installing applications (PodTrapper alone is 350k). Realizing that the OS and other apps also have to fit in RAM, leaking a 100kb string becomes a huge problem. There are lots of forum posts by people trying to figure out why their phone keeps running out of memory and needs to be rebooted. It’s a large enough problem that there are apps for automatically restarting your phone. I can definitely see why Apple has been hesitant to open up background processing on the iPhone. It’s really easy for bad developers to make the whole platform look bad.
Personally, I think it’s kind of cool that you can run apps in the background on BlackBerry, and send them to the foreground and back. However, I think the simplest, default behavior should lean towards cleaning up the app neatly, while sitting on memory and processes when your app goes out of scope should be a special behavior that advanced developers can request. Not the other way around.
So what about that red key? What if you’re developing a game or animation that makes no sense in the background, and you just want it to clean up whenever the user dismisses it?
Andrew proposed the following solution (for use in a subclass of Screen):
Do-it-yourself custom GUI for a range of MIDP devices
Suppose you’re writing a game or application, and you’d like it to have an attractive, professional-looking GUI (with your theme, brand, or skin), and you’d like it to run on as many Java ME MIDP devices as possible. There’s some work to be done, but it’s not that hard. I wrote about how to do it in the last chapter of my book, and it was the topic of my Jazoon talk. Plus I wrote a library of utilities to simplify the task (the Frog-Parrot UI Library), but — looking over my blog the other day — it hit me that I never really posted a technical explanation of how to use this library.
Here’s the general idea:
If you want a mature product for MIDP customization — one that will teach you how MIDP customization works as you’re using it — J2ME Polish is a good place to start, as I explained here. But in practice, I found that I wanted 100% control over the look-and-feel of the GUI, which I couldn’t get from J2ME Polish.
Essentially, handsets have a list of standard screen sizes, and many of them are so small that I need to have pixel-by-pixel control over where everything is placed. Having the device place the widgets, etc., for you — guessing where you want them based on layout algorithms — isn’t nearly as useful on a small screen as it is on, say, a big browser window on a P.C. So I wrote a library that would allow me to bundle the screen information into resource files, selecting the right image files for each screen size and passing along the data for how big widgets and images are and where they should be placed.
The annoying thing about making a custom GUI for MIDP is that you have to start from scratch, drawing your GUI onto a blank canvas. That means re-inventing the wheel on some very standard functionality: widget navigation, navigating back and forth through a stack of screens, scrolling, and even cutting up a paragraph of text in the right places so it won’t disappear off the edge of the page. That’s the functionality I’ve written for you in the FPUIL (which you can use however you like, as long as you don’t imagine it comes with a warranty. 😉 ).
In this brand-new version (which I just re-worked today on a Windows machine, download here), I’ve included some build files to build the project with Ant and Antenna. Look at the build.xml and build_all.xml files to see some examples and explanation of how to build a MIDlet for different target devices.
That should be enough to get started, and if I find some time, I’ll try to write more explanation…
My game page is back on line!
My free sample game and code page is back on line here. I had some problems with my earlier web host, so I found a new one. This means that some of the links to sample jars and code on earlier blog entries may be broken, but all of the code should be available on the new game page (and, as before, you can open the game page in your mobile device’s browser and install the games and apps directly from there). I’ve rebuilt many of these on the latest version of the WTK, and I’m working on testing them on some new devices. If any of them aren’t working, feel free to leave a comment. The “Frog-Parrot User Interface Library” — a set of simple utilities to create a customizable user-interface for a range of MIDP devices — is available as WidgetCanvas, with the source code here.
I’m sorry I haven’t kept up this blog very well lately. (Wow, the last thing I posted about was Jazoon 2008, and the Jazoon folks are already gearing up for 2009!) The thing is that I’ve switched gears enigineering-wise — I haven’t been working in Java ME for over a year, so I haven’t had much new stuff to add here. I’ve mostly been working in software testing automation, but since I’ve been working mostly with proprietary software, I haven’t done much that I can post about.
But I’m planning some new projects this summer that I’ll be writing about! (Not necessarily all in Java ME…)
FPUIL: Frog-Parrot User Interface Library
I’ve finished my little library of UI utilities, which you can download here: FPUIL.tar.gz or FPUIL.zip.
Just unzip the directory, placing the WidgetCanvas folder in the apps folder of the WTK, and you can open it as a project.
This set of classes is intended to help with a “managing fragmentation” strategy of type “DERIVE-MULTI > SELECTIVE” (see Device Fragmentation of Mobile Applications for the theory). As explained on TomSoft, this is a good strategy for one-shot projects, and it’s the strategy I’ll be discussing at Jazoon.
Here are some notes on using this little library: Continue reading
Game page update
I’ve updated my sample game page to include links directly to the jar files (as some people have requested).
Sorry I haven’t been keeping this blog updated lately — since I’m not currently working on a book, I guess I’m not doing as many independent projects as I used to. However, I do have a new one coming up that I’m planning to post to this blog over the next couple of weeks:
As I’ve said before, the Java ME lcdui classes don’t allow enough customization of the look-and-feel to be appropriate for use in a professional application. So everyone ends up implementing their own UI classes, starting from a blank canvas. Since the basics are always the same, I was thinking of writing a simple library of basic UI navigation classes (starting from the classes I wrote for Chapter 10 of my book) and posting it. Anyone can write such classes, but perhaps it will save someone some time…
Dungeon Plus!!!
I’ve just created a new version of my Dungeon game featuring a custom user interface!!!
As I was saying the other day, the lcdui components don’t make for a very attractive user interface. Particularly for a game, it’s nice to have all of the game’s GUI components match the style and theme of the game. Rather than going with a third-party solution, it’s possible to program the entire user-interface yourself by painting it onto a canvas. One advantage to this is that you can really optimize and only add code that’s relevant to the game rather than filling your game jar with code for widgets you might have used but didn’t.
For my dungeon game (which you can download from my game page which I’ve conveniently added to my sidebar) I’ve added a bunch of new graphical features to make it more attractive. First it starts with an animated splash screen:
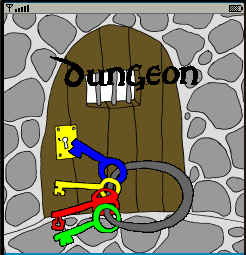
The title and the keys fade in if the handset supports a sufficient amount of blending, otherwise they slide in from the sides of the screen.
Then I’ve painted the timer and custom softkeys onto a full-screen canvas instead of using lcdui commands:

This includes two different sizes of graphics for different screen sizes:


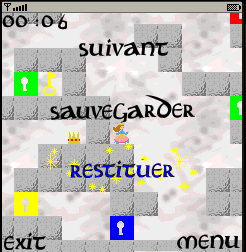
Then the menu of options is painted over the current game screen. I’ve indicated which item is selected by coloring the text blue and putting stars behind it with an animated sparkling effect:

Plus, it shows the labels in French if the microedition.locale system property starts with “fr”:
As I said before, the hardest part is to get the keycodes right for the softkeys. And unfortunately, even if you have a list of key codes for a number of common handsets, it isn’t always easy for the MIDlet to identify the handset. The microedition.platform system property sometimes helps, but not always. Some manufacturers just set this property to return the generic string “j2me” and from there, there’s not a lot your MIDlet can do.
The current version of Dungeon is set so that the custom softkeys will work on the Sagem my700x and probably some other handsets. However if it doesn’t work, I’ve provided a second version with the custom softkey feature disabled. This second version still has the custom menus I’ve added, but uses lcdui commands to make the menu appear and disappear. This is what it looks like:

It’s not as pretty, but I guess it’s not the end of the world…
Let’s try J2ME Polish!
Suppose you’ve developed a game that starts with a menu of options using the standard MIDP lcdui menu components. It won’t be long before you notice that — on practically every MIDP handset — the lcdui menu components are, well, kind of ugly. And since the lcdui package has a “simplicity over flexibility” philosophy, there’s not a lot you can do to improve your game’s appearance without dumping the lcdui components entirely and drawing your own menu widgets onto a canvas. That’s a lot of work for an existing game, and a possible alternative strategy is to go with J2ME Polish.
J2ME Polish is a set of user-interface libraries that you can add to a MIDlet jar, plus the tools to automatically transform an existing lcdui interface into one that uses the polished user-interface libraries (for a price, of course…).
J2ME Polish works by sending your code through a pre-processing phase that transforms the lcdui calls so that they call J2ME Polish classes instead. To indicate which parts of the code you’d like to transform and how, you add pre-processing directives to your code (very much like the pre-processing directives used when programming in C). To define the precise look-and-feel you want (for example the colors and images to use), you write a series of cascading style sheets and create a hierarchy of resource directories for the various devices you’d like to support and/or for the various “skins” you’d like to use. All the bits of the build process are controlled by standard Ant build scripts.
Sound complicated?
Actually it is, but it’s a lot simpler than attempting to write your own custom user interface from scratch. Unfortunately most of the complexity comes from compensating for all of the differences from one handset to the next, and — with or without J2ME Polish — you always have to deal with this problem if you want to have graphics that look good on a wide range of handsets.
In practice J2ME Polish is pretty easy to use. I know this because I’ve used it professionally — here’s a game catalog skin we did for Orange using J2ME Polish:

I liked working with J2ME Polish because the natural complexity of the custom user interface problem is organized in a logical way, plus the online documentation is quite clear and extensive, and it’s nice that it follows standards such as css and Ant. (If you’re not already using Ant to build Java ME projects, you probably should be 😉 )
For my latest programming exercise, I decided to download J2ME Polish and see how hard it would be to customize the demo to run on my Sagem my700x. As you can see from the above photo, I’ve already done a J2ME Polish project for this very handset, but I can’t just post the EGE code here because that would be too easy (not to mention illegal…). Anyway, it’s more interesting to start from scratch.
Downloading and installing it was no problem, so I headed straight for the tutorial. The tutorial consists of building a simple sample menu midlet that illustrates how to add some basic J2ME Polish preprocessing directives to transform an lcdui menu into a polished menu. Plus a basic build script and resource directories. To build the sample, all I had to do was go into the menu directory (the directory containing the correct build.xml file) and type “ant.” (If I hadn’t had Ant already set up and configured on my machine, there would of course be an extra step here…) Ant proceeded to build a series of jad and jar files for both the English and German versions of the sample for the following handsets: Sony-Ericsson/P900, Nokia/Series60, Nokia/Series60Midp2, Generic/midp2, Generic/midp1. Naturally, my first thought was to poke around in the build.xml file to see where this list of handsets is defined so I could add my Sagem to it. It was pretty easy to find (in the “deviceRequirements” element), so — following the pattern — I added “Sagem/my700x”.
Just adding the Sagem my700x to the build file wasn’t sufficient though, since — as you might guess — the capabilities of the devices are defined in a file somewhere, and my handset wasn’t there. Grepping around for terms like “Nokia” and “Sagem” I found the capabilities of each device defined in “devices.xml” and “custom-devices.xml.” The “devices.xml” file listed a Sagem myX7, but the capabilities weren’t quite the same as my handset (notably the screen size and CLDC version were off), so I added a new entry for my handset, following the model of the others.
The “custom-devices.xml” file says in its header that you’re supposed to modify that file instead of modifying “devices.xml,” but for some reason just adding the device to “custom-devices.xml” didn’t work. I could read the manual to try to figure out why (because you know how they say “when all else fails read the manual”), but all else hadn’t failed yet since adding it to “devices.xml” worked. 😉 And anyway, for this exercise I just wanted to see how quickly I could get the project working — beautification comes later.
To find the data to use in the “devices.xml” file, I consulted the J2ME Polish device database. This is a great resource because it lists all sorts of useful data for developers about a huge list of handsets. In particular, it lists a lot of the softkey keycodes which (as I mentioned earlier) are often hard to find. It didn’t list the keycodes for my little Sagem, but fortunately I’d figured them out myself in my previous exercise about keycodes.
The reason I want to know the keycodes for the softkeys is because that allows J2ME Polish to polish the softbar — that is, to draw a pretty softbar that matches the rest of the user-interface design rather than having a mixed look that includes polished user-interface components with an ugly lcdui softbar.
Obviously I wanted the nice polished softbar since I have the data to do it, so in the “devices.xml” file I added the “LeftSoftKey” and “RightSoftKey” data to my description of my Sagem my700x, following the example of some other handset descriptions that had softkeys listed. That wasn’t sufficient to get it to use the softkey values and create a pretty softbar though, so this time I finally broke down and consulted the documentation to figure out why. Annoyingly enough, I couldn’t find anything about softkeys except a hint that in the build element of the build.xml file the “fullscreen” attribute needs to be set to “true” or “menu.” It was already set to that, though, so I figured there had to be something else. So, back to the standard troubleshooting bag of tricks, I compared the device descriptions of those devices with polished softbars and those without, and a little trial and error led to the idea that “hasCommandKeyEvents” needs to be listed in the “features” element of the device. That did the trick, and I ended up with a nice little demo for my handset.
All in all, I would say it was about a half-day’s worth of work (including some leisurely coffee-breaks 😉 ).
For a professional project, I would of course recommend reading the manual or the book first in order to set everything up right (rather than just sloppily plunging forward as I’ve done here), but as you can see from this example, J2ME Polish is a pretty quick and easy way to fix up your MIDlet’s user interface.
